Tech Blog
Since 2004
Visual Studio How to target different/latest c# version (.NET Core 3 and C# 8)

- October 9, 2019
Rest of the Story:
Know which version of c# you were actually using or wanting to try latest c# 8 features? How to check?
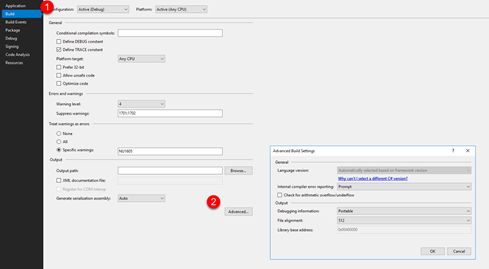
- Open the project properties window (right click on project, select properties)
- Select ‘Build’ from the left hand side options
- Scroll down to the Advanced options
- Select the desired version of c#, click ok Wanting c# 8 selection? (released with .NET Core 3, and available as part of Visual Studio 2019 (latest release) * For me, open Visual Studio select Help – Check for Updates (and download the latest release of VS.NET)
 After the update, open VS.NET revisit project properties and c# 8 should be available in the ‘Language Version’ selection list….but wait it is not there (the selection list is disabled and they gave me a clue…Why can’t I select a different c# version?
”The latest C# compiler determines a default language version based on your project's target framework or frameworks. This is because the C# language may have features that rely on types or runtime components that are not available in every .NET implementation. This also ensures that for whatever target your project is built against, you get the highest compatible language version by default.” Ok, so now the c# version is not selectable, it is based on the projects target framework. Here is the conversion chart…
| Target framework | version | C# language version default |
|---|---|---|
| .NET Core | 3.x | C# 8.0 |
| .NET Core | 2.x | C# 7.3 |
| .NET Standard | 2.1 | C# 8.0 |
| .NET Standard | 2.0 | C# 7.3 |
| .NET Standard | 1.x | C# 7.3 |
| .NET Framework | all | C# 7.3 |
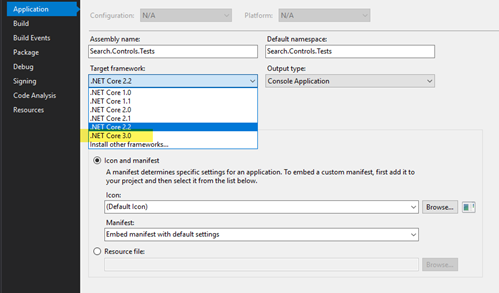
So this is telling me, that in order for my project to use c# 8 I have to change my target framework to .NET Core 3.x.
References Download .NET Core 3 Direct option Released 2019-09-23 New C# 8 Features One of the more important features…
Nullable reference types (this is good addition)
The core idea is to allow variable type definitions to specify whether they can have null value assigned to them or not: Weapon? canBeNull;
IWeapon cantBeNull;
Assigning a null value or a potential null value to a non-nullable variable results in a compiler warning (the developer can configure the build to fail in case of such warnings, to be extra safe):
canBeNull = null
// no warning
cantBeNull = null
// warning
cantBeNull = canBeNull; // warning
Similarly, warnings are generated when dereferencing a nullable variable without checking it for null value first:
canBeNull.Repair();
// warning
cantBeNull.Repair();
// no warning
if (canBeNull != null)
{
canBeNull.Repair();
// no warning
}
The problem with such a change is that it breaks existing code: the feature assumes that all variables from before the change are non-nullable. To cope with that, static analysis for null-safety can be enabled selectively with a compiler switch at the project level.
Developers can opt-in for nullability checking when they are ready to deal with the resulting warnings.
Still, this should be in their own best interest, as the warnings might reveal potential bugs in their code.
The switch is persisted as a property in the project file. There’s no user interface in Visual Studio 2019 yet for changing its value. Therefore, the following line must be added manually to the first PropertyGroup element of the project file to enable the feature for the project:

